2009年7月30日 星期四

Google Blogger 縮排技巧


每次用Google blogger 在排版上都會有種困擾,在此提供一個小技巧

就是利用Google Site (協作平台) 的編輯器 修改, 雖然都是google 的 不過 google site 的編寫平台就比較方便

舉例說明 我要將以下的html 程式碼貼到blogger


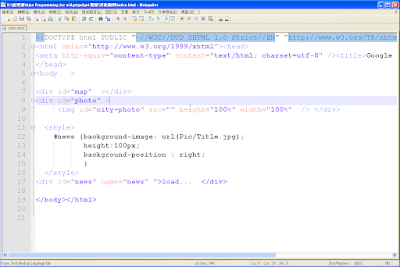
若是直接貼的話會有以下的錯誤

1. "<" , ">" 是 html 保留字元
2. 縮排會跑掉


而利用google site 步驟如下

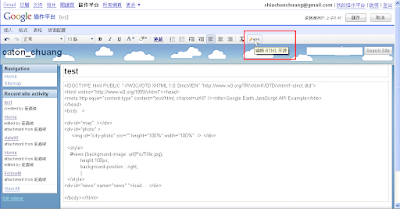
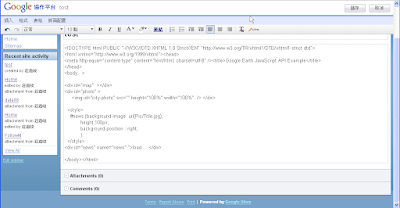
1. 打開google site , 在編輯頁面上貼上想要貼的程式碼


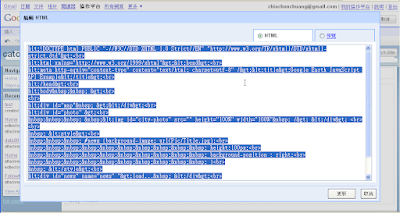
2. 點選html標籤,接者google site 編輯器 會自動幫你轉碼


3. 最後將剛才轉好得html碼貼到blogger就好了

結果如下:


<!DOCTYPE html PUBLIC "-//W3C//DTD XHTML 1.0 Strict//EN" "http://www.w3.org/TR/xhtml1/DTD/xhtml1-strict.dtd">

<html xmlns="http://www.w3.org/1999/xhtml"><head>

<meta http-equiv="content-type" content="text/html; charset=utf-8" /><title>Google Earth JavaScript API Example</title>

</head>

<body   >


<div id="map"  ></div>

<div id="photo" >

     <img id="city-photo" src="" height="100%" width="100%"  /> </div>


  <style>

    #news {background-image: url(Pic/Title.jpg);

           height:100px;

           background-position : right;

           }

  </style>

<div id="news" name="news" ">load...  </div>


</body></html>


雖然還是有點麻煩,但比我之前用純文字加html編輯好用的多

2009年7月28日 星期二

Google Api in .Net 實做

以下我是用 VS2008 和 win XP 為環境做的簡單程式


基本上照這裡的步驟就OK 了, 教學網址


流程
1. 下載 Google Data API Setup.msi .NET Client Library 現在是(1.4.0.2 )
2. 開啟新專案, 這裡我是用 WPF 的專案, 不過沒有差別,基本上都是用C#寫(.CS檔)
3. Add Reference 如圖

4. 選擇Browse tag , 尋找Google api SDK 的路徑 , 預設都會將相關的DLL在 C:\Program Files\Google\Google Data API SDK\Redist


5. 選擇要引用的DLL, 這裡要用的有 Google.GData.Client.dll, Google.GData.Extensions.dll 這兩個DLL , 此外, 因為是以 Calendar 為範例 所以也要引用 Google.GData.Calendar.dll

6. 引用完這些DLL , 但還會無法執行,因為驗證沒過,所以 必須還要在引用 Google.GData.AccessControl.dll


在這個簡單例子我是用這個 UI , 按一下 click me 就會顯示google Calendar 的日曆清單


code 如下

//-------------------------------------------------------
// Window1.xaml.cs
//-------------------------------------------------------

using System;
using System.Collections.Generic;
using System.Text;
using System.Windows;
using System.Windows.Controls;
using System.Windows.Data;
using System.Windows.Documents;
using System.Windows.Input;
using System.Windows.Media;
using System.Windows.Media.Imaging;
using System.Windows.Navigation;
using System.Windows.Shapes;

using Google.GData.Calendar;
using Google.GData.Client;
using Google.GData.Extensions;

namespace WPFGoogle
{

/// Interaction logic for Window1.xaml

public partial class Window1 : Window
{
public Window1()
{
InitializeComponent();
}


void button_Click(object sender, RoutedEventArgs e)
{

CalendarService myService = new CalendarService("exampleCo-exampleApp-1");
myService.setUserCredentials("Your@gmail.com", "YourPassword");

CalendarQuery query = new CalendarQuery();
query.Uri = new Uri("http://www.google.com/calendar/feeds/default/allcalendars/full");

String Temp;

CalendarFeed resultFeed = myService.Query(query);

/// Get calnedars List
Temp = "Your calendars:\n";
foreach (CalendarEntry entry in resultFeed.Entries)
{
Temp = Temp + entry.Title.Text + "\n";

}

/// Show the Message
MessageBox.Show(Temp);


}

}
}

萬一需要設定 proxy 則 必須 修改 code 如下

//-------------------------------------------------------
// Window1.xaml.cs
//-------------------------------------------------------

using System;
using System.Collections.Generic;
using System.Text;
using System.Windows;
using System.Windows.Controls;
using System.Windows.Data;
using System.Windows.Documents;
using System.Windows.Input;
using System.Windows.Media;
using System.Windows.Media.Imaging;
using System.Windows.Navigation;
using System.Windows.Shapes;

using Google.GData.Calendar;
using Google.GData.Client;
using Google.GData.Extensions;

using System.Net;

namespace WPFGoogle
{

/// Interaction logic for Window1.xaml

public partial class Window1 : Window
{
public Window1()
{
InitializeComponent();
}


void button_Click(object sender, RoutedEventArgs e)
{

CalendarService myService = new CalendarService("exampleCo-exampleApp-1");
myService.setUserCredentials("Your@gmail.com", "YourPassword");

CalendarQuery query = new CalendarQuery();
query.Uri = new Uri("http://www.google.com/calendar/feeds/default/allcalendars/full");


/// Set proxy

GDataRequestFactory requestFactory = (GDataRequestFactory)myService.RequestFactory;

IWebProxy iProxy = WebRequest.DefaultWebProxy;

WebProxy myProxy = new WebProxy(iProxy.GetProxy(query.Uri));

// /potentially, setup credentials on the proxy here

myProxy.Credentials = CredentialCache.DefaultCredentials;

myProxy.UseDefaultCredentials = true; requestFactory.Proxy = myProxy;


String Temp;

CalendarFeed resultFeed = myService.Query(query);

Temp = "Your calendars:\n";
/// Get calnedars List
foreach (CalendarEntry entry in resultFeed.Entries)
{
Temp = Temp + entry.Title.Text + "\n";

}

/// Show the Message
MessageBox.Show(Temp);


}

}
}
2009年7月24日 星期五

GAE&JDO simple 範例2- 兩個 table

這個範例流程大致以

Google App Engines Datastore with JDO ( GAE&JDO 1/7))

為基礎


不同的是這個範例定義了兩個table , User and Item
如圖,在管理介面就可以看到兩個 datastore


範例網址如下
http://catontest2db.appspot.com/


Code 如下, 要使用必須解壓縮,在由 eclipse import

http://cid-2342c47dd088c3cb.skydrive.live.com/self.aspx/.Public/Jdoand2Data.7z

2009年7月21日 星期二

Google api in .net

為了團隊合作,不得以使用.net 來取得 google api...

Google 的簡介還蠻清楚的,可以見這裡

安裝好Google Data API SDk 後
在 ..\Sources\Samples\ 裡有很多 sample 可以看, 算是蠻貼心的 一點,
不過在公司因為proxy 的關係, 必須還要設定proxy


設定 proxy 可以參照 這裡的說明

不過實際操作還要作一些調整

以下我就舉兩個例子


1. CodeSearchDemo

a. 找到檔案 codesearchdemo.cs

b. 在檔案內加入 Using System.Net

c. 找到 RefreshFeedList() 這個 function


將下面的 code 加在 query.NumberToRetrieve = 2; 之後

GDataRequestFactory requestFactory = (GDataRequestFactory)service.RequestFactory; IWebProxy iProxy = WebRequest.DefaultWebProxy; WebProxy myProxy = new WebProxy(iProxy.GetProxy(query.Uri)); // potentially, setup credentials on the proxy here myProxy.Credentials = CredentialCache.DefaultCredentials; myProxy.UseDefaultCredentials = true; requestFactory.Proxy = myProxy;

2. DocListUploader
a. 找到檔案 HiddenForm.cs

b. 在檔案內加入 Using System.Net

c. 找到 Login(string username, string password)這個 function

將下面的 code 加在 service = new DocumentsService("DocListUploader"); 之後

GDataRequestFactory requestFactory = (GDataRequestFactory)service.RequestFactory; IWebProxy iProxy = WebRequest.DefaultWebProxy; // potentially, setup credentials on the proxy here iProxy.Credentials = CredentialCache.DefaultCredentials; requestFactory.Proxy = iProxy;


不過 有點納悶的是 在 calendar 這個 DEMO


CredentialCache.DefaultCredentials; 無法取得驗證
如圖


之後找到問題的話在我會在修改

2009年7月20日 星期一

Google Api key and Google App engine

一個小心得, 當local 端 程式有使用到 google api key 的功能時, 上傳到其他網站,
如 google app engine 的網址時, 記得重新申請一組 key 註冊要上傳的網址

Google Gears API Sample 簡單的離線網站

這個範例是修改自 Gears Tutorial 並po 到google app engine 作實際的測試, 如何上傳見 eclipse 上傳 google app engine


以下是步驟

1. 安裝 Gears


2. 將下載的檔案放入要上傳的位置,如 ../war


3. go_offline.html ,確認 .js file 的位置


4. 修改 tutorial_manifest.json, 這裡的內容(entries)決定 gears 會紀錄的檔案, url 後面是相對入路徑


"entries": [ { "url": "gears_init.js"}, { "url": "go_offline.html"}, { "url": "go_offline.js"} ]


驗證步驟
   1. 將上述步驟設定好得程式放上網路上, 我是傳到google app engine , http://2.latest.catontest2.appspot.com/
2. 先進入 該網站 點選 "cacture"

3. 接者設定 將 瀏覽器設為 離線瀏覽
FireFox: 檔案 -> 離線模式
IE: 檔案 -> 離線工作
4. 清除 網頁Catch , 以釐清是否事由Gears 讀取:
FireFox: 工具-> 清除隱私資料-> 快取打勾後按下 "立即清除隱私資料"
IE: 工具-> 網際網路選項->Temporary Internet files -> 刪除檔案

5. 在離線瀏覽下進入 網頁 , 若 gears 設定 有成功即可瀏覽, 否則會有一般無法連線的錯誤訊息
http://2.latest.catontest2.appspot.com/
無法進入,可以改由這個網址進入   

http://2.latest.catontest2.appspot.com/go_offline.html

Google Gears API 初入門實做

Google Gears 提供了離線瀏覽的功能,像 GMail, Google reader 等已經支援這種功能.

除了使用Google 自家東西的離線瀏覽功能,他還提供了開發的方式,供開發者自行開發離線的網頁服務


雖然 google 的網頁寫得還蠻清楚的,但還是自己實做一遍記錄下來映像比較深刻

官網所建議的入門基礎
  • Ability to edit basic JavaScript
  • Ability to publish files to the HTTP server that hosts your files
  • The static files that you want to enable for offline viewing
  • Gears is available for Windows, Windows Mobile (IE Mobile, Opera Mobile), Mac (Firefox, Safari), Linux and Android


需要下載的檔案


Sample Getting Start

1. 安裝 Gears
2. 檢查是否有安裝 Gears
下載 gears_init.js

加入以下code 在head之間,如此便會檢查是否有安裝google Gears,若沒有則跳轉到安裝頁面

<script src="gears_init.js"></script>
<script>
if (!window.google || !google.gears) {
location.href = "http://gears.google.com/?action=install&message=<your welcome message>" +
"&return=<your website url>";
}
</script>

2009年7月15日 星期三

JSP read GAE&JDO

基本上是GAE&JDO by XMLHttpRequest()
這一篇的延伸

主要差異就是結合javascript 和 JSP 來讀取 JDO 的資料


在此設定如下

1. 在JDO中定一個資料表User 包含 Name 和 Content 兩個欄位
2. 建立一個JSP file " testIndex.jsp" , 記得修改 war/WEB-INF/web.xml 的 welcome-file-list 為 testIndex.jsp


其他就不贅述了 直接看看 testIndex.jsp 的結構, 記得要在head 之上 import 些定義好得class

以下會比較一下 testIndex.jsp 中 function show() 在server端撰寫 和編譯後的情況


Server CODE 如下

<%@ page contentType="text/html; charset=Big5" import="java.io.*" pageEncoding="Big5" %>

<%@ page import="jsp.jdo.*" %> <%@ page import="jsp.jdo.User" %> <%@ page import="javax.jdo.PersistenceManager" %> <%@ page import="java.util.List" %>

<html>
<head>

<meta http-equiv="content-type" content="text/html; charset=charset=big5">

<title>JSP read JDO file</title>

<script type="text/javascript">


// --------------------------------------------------------- // set httprequest by explorer // ---------------------------------------------------------
XmlsReq = false;
if(window.XMLHttpRequest) {
XmlsReq = new XMLHttpRequest(); // common
} else if(window.ActiveXObject) {
try {
XmlsReq = new ActiveXObject("Msxml2.XMLHTTP"); // ie
} catch(e) {
XmlsReq = new ActiveXObject("Microsoft.XMLHTTP"); // ie
}
}


// --------------------------------------------------------- // Add Http request to add user information // ---------------------------------------------------------
function PostHttpRequestAdd() {
var uri='add';
XmlsReq.onreadystatechange=function() {
if (XmlsReq.readyState==4 && XmlsReq.status == 200) {
alert(XmlsReq.responseText);
}
}


var aUserName = document.getElementById('aUserName').value;
var aUserContent= document.getElementById('aUserContent').value;


var param = "aUserName="+aUserName+"&aUserContent="+aUserContent;

XmlsReq.open("POST",uri,true);
XmlsReq.setRequestHeader('Content-Type', 'application/x-www-form-urlencoded');
XmlsReq.send(param);
}


// ---------------------------------------------------------
// Show the all User in the JDO File by JSP
// ---------------------------------------------------------
function Show() {
var TempString ;
var Size;
<%
/// get Persistence Manager
PersistenceManager pm = PMF.get().getPersistenceManager();
/// set query String
String query = "select from " + User.class.getName() ;
/// start query
ist<User> userAll = (List<User>) pm.newQuery(query).execute();
if(userAll.isEmpty()){
%>
alert("The User has no Item");
<%
}
else { %> Size = <%= userAll.size() %> ;
TempString = new Array(Size);
for(var i = 0; i < Size; i++)  
TempString[i] = new Array(2);
<%
for (int i=0;i<userAll.size();i++) {
%>
// save in TempString
// userAll.get(i).GetName() 回傳字串,但javascript 字串要放在雙引號內""
TempString[<%= i %>][0]="<%= userAll.get(i).GetName() %>";
TempString[<%= i %>][1]="<%= userAll.get(i).GetContent() %>";
<%
}
}
%>
alert(TempString[3][1]);
}


</script>


</head>


<body>
<h2>讀取JDO File </h2><hr>


<table>
<tr>
<td colspan="2" style="font-weight:bold;">Available Servlets:</td>
</tr>
<tr>
<td><a href="jspjdo"/>jspJDOServlet</td>
</tr>

<tr>
<td colspan="2" style="font-weight:bold;">Add function:</td>
</tr>
<tr>
<td>

請輸入姓名:
<input type=text Id="aUserName">
請輸入Content:
<input type=text Id="aUserContent">

<input type=submit value="確定新增" onclick="PostHttpRequestAdd()">

</td>
</tr>

<tr>
<td colspan="2" style="font-weight:bold;">Show all user:</td>
</tr>
<tr>
<td>
<input type=submit value="顯示所有使用者" onclick="Show()">
</td>
</tr>


</table>

</body>
</html>


Show function 編譯後
// ---------------------------------------------------------
// Show the all User in the JDO File by JSP
// ---------------------------------------------------------
function Show() {

var TempString ;

var Size;

Size = 5 ;

TempString = new Array(Size);
for(var i = 0; i < style="color: rgb(0, 102, 0);">
// save in TempString
// userAll.get(i).GetName() 回傳字串,但javascript 字串要放在雙引號內""

TempString[0][0]="null";
TempString[0][1]="null";

// save in TempString // userAll.get(i).GetName() 回傳字串,但javascript 字串要放在雙引號內""

TempString[1][0]="null";
TempString[1][1]="null";

// save in TempString // userAll.get(i).GetName() 回傳字串,但javascript 字串要放在雙引號內""

TempString[2][0]="dg";
TempString[2][1]="gg";
// save in TempString // userAll.get(i).GetName() 回傳字串,但javascript 字串要放在雙引號內""

TempString[3][0]="gg";
TempString[3][1]="hh";

// save in TempString // userAll.get(i).GetName() 回傳字串,但javascript 字串要放在雙引號內""

TempString[4][0]="gfjj";
TempString[4][1]="ll";

alert(TempString[3][1]);
}


但可惜的是目前無法將 含有jsp file 的 檔案無放上傳到 google app engine....
可參考 這個議題


jsp 教學可參考
http://caterpillar.onlyfun.net/Gossip/JSPServlet/JSPServlet.htm

2009年7月14日 星期二

轉貼 JSP 中文亂碼解決

轉貼自 java world

加入以上code 可以解決中文亂碼問題

<%@ page contentType="text/html;charset=Big5" pageEncoding="Big5" %>
<meta HTTP-EQUIV=Content-Type content="text/html;charset=Big5">